SFMC | Onboarding Training Assignment

This assignment is to help new Salesforce Marketing Cloud (SFMC) users become more accustomed to the ins and outs of creating and editing emails in the university instance of SFMC. This will provide an opportunity to familiarize you further with the various processes involved in building and eventually sending an email.

Your focused objectives for this assignment are: 

  • Understanding how to access Salesforce Marketing Cloud (SFMC) and navigate to Email Studio
  • Locating and utilizing our shared, branded templates and other assets
  • Maintaining the integrity of Ohio State's brand, look, and feel within an email using real or sample content
  • Understanding the differences between an email template and an email message
  • Becoming familiar with SFMC internal (Local) file structure and how to save your content in your college/unit folder

From here, you can decide to:

  1. Follow along with the instructions below to create an email message
  2. Create an email message with content from your team's email strategy demonstrating your readiness to use SFMC. If you create your own, be sure to save it in your unit's local folder.

When done, submit the assignment and we will review your submission within two business days.
Working in Salesforce Marketing Cloud

1 1. Log into Salesforce Marketing Cloud

Salesforce Marketing Cloud utilizes your single sign-on access. Most new users have limited access until this assignment is completed. Upon completion and approval, proper access will be granted. 

SFMC log in: https://go.osu.edu/sfmc-login

2 2. Check the business unit

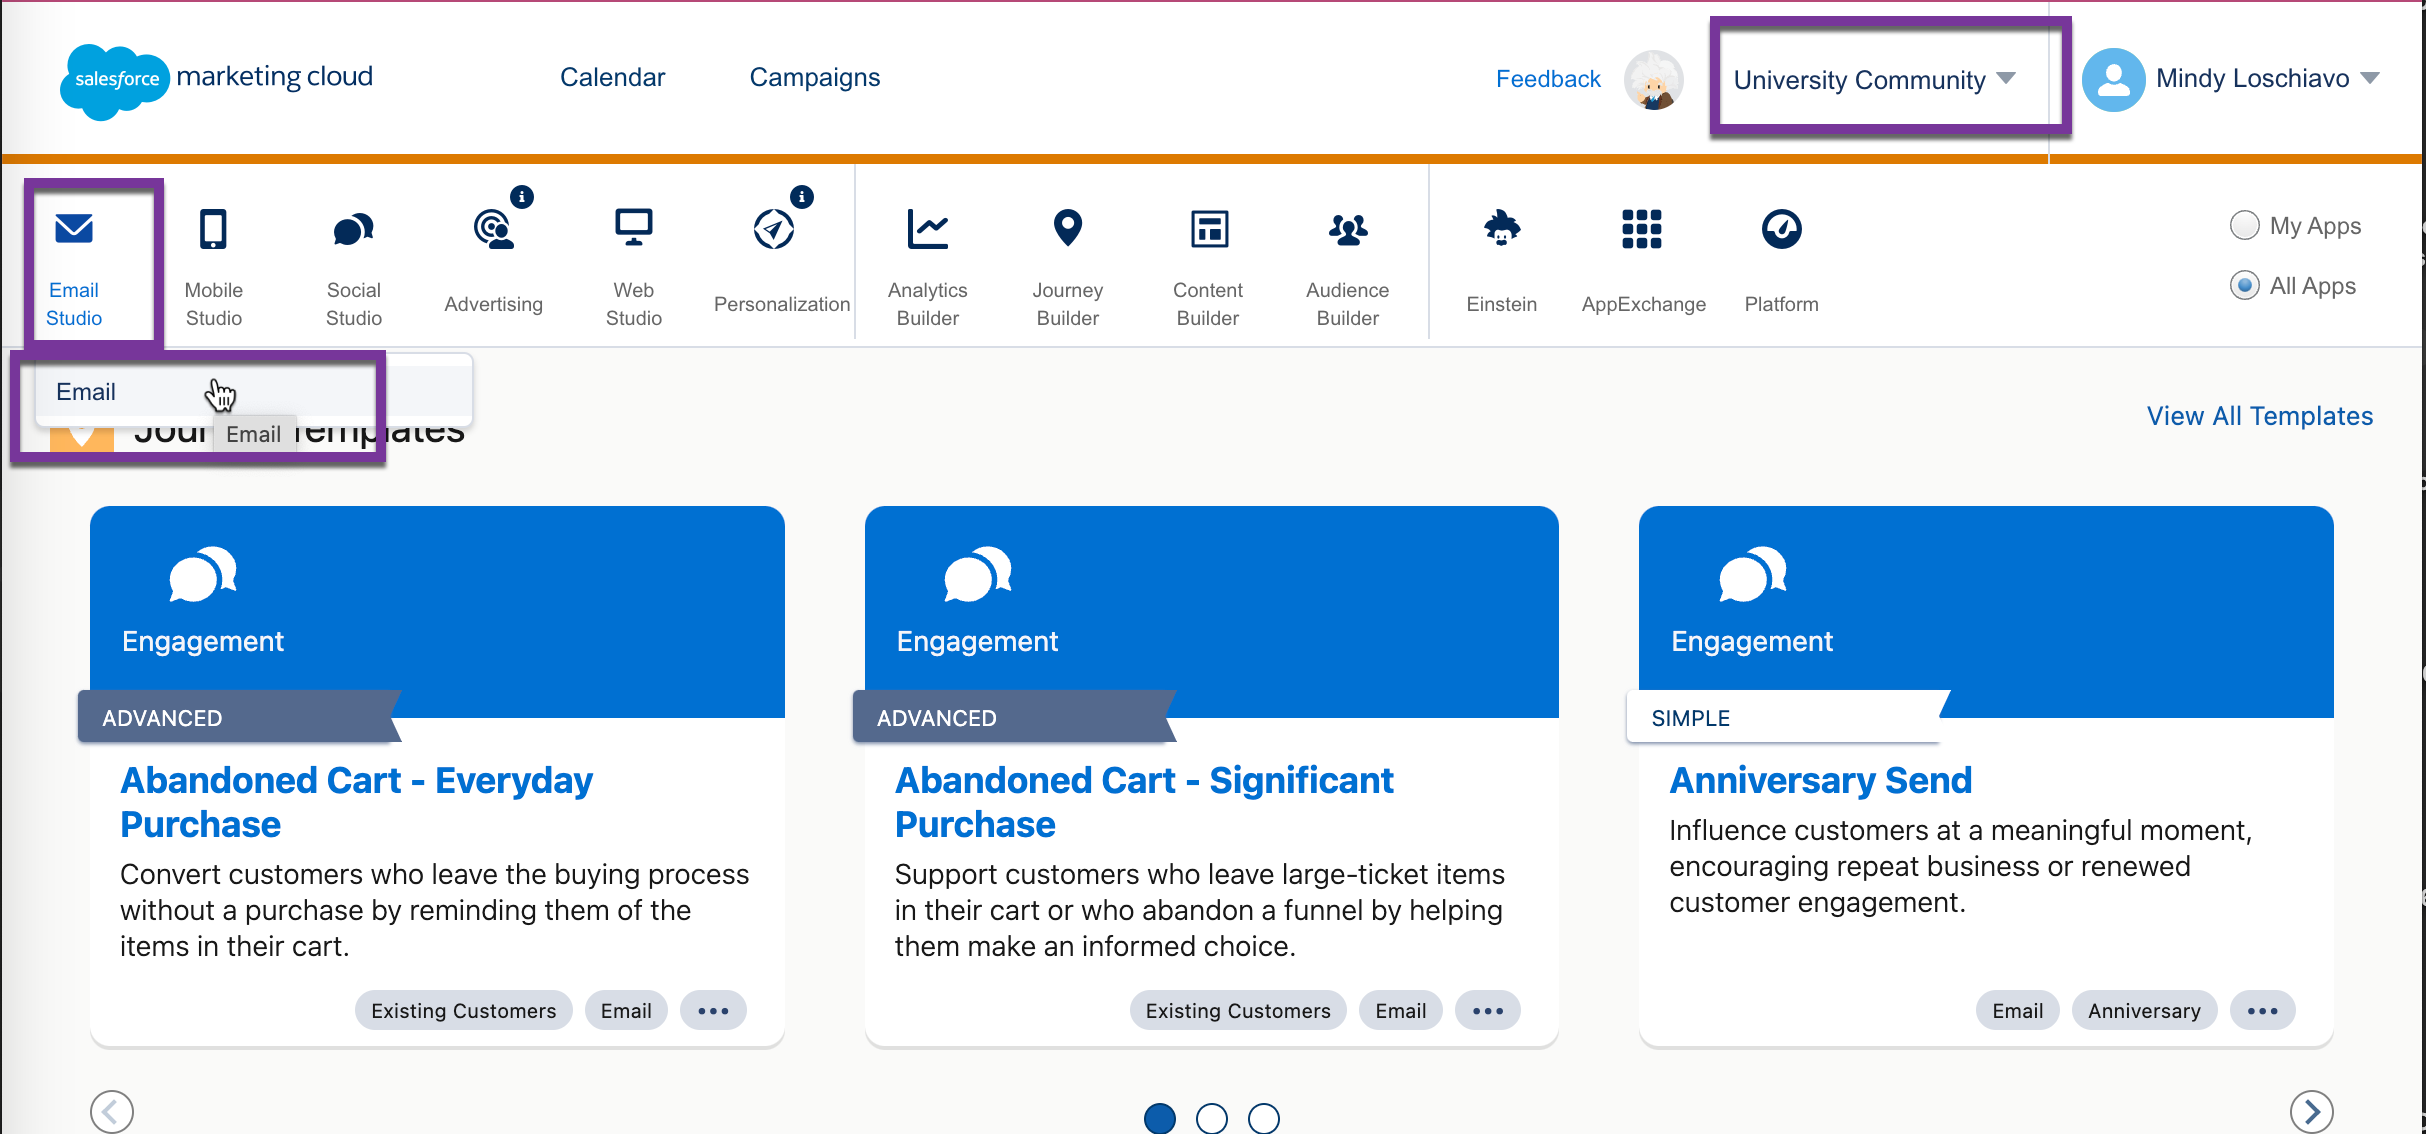
Note which Business Unit*[i] you are in by looking at the name between the Einstein icon and your name and person icon in the upper right corner of the screen.


[i] Starred* items will be needed for when you submit this assignment.

3 3. Enter email content studio

To enter Email Content Studio:

  1. Click Email Studio, then Email. You are now in the Overview of Email Studio.
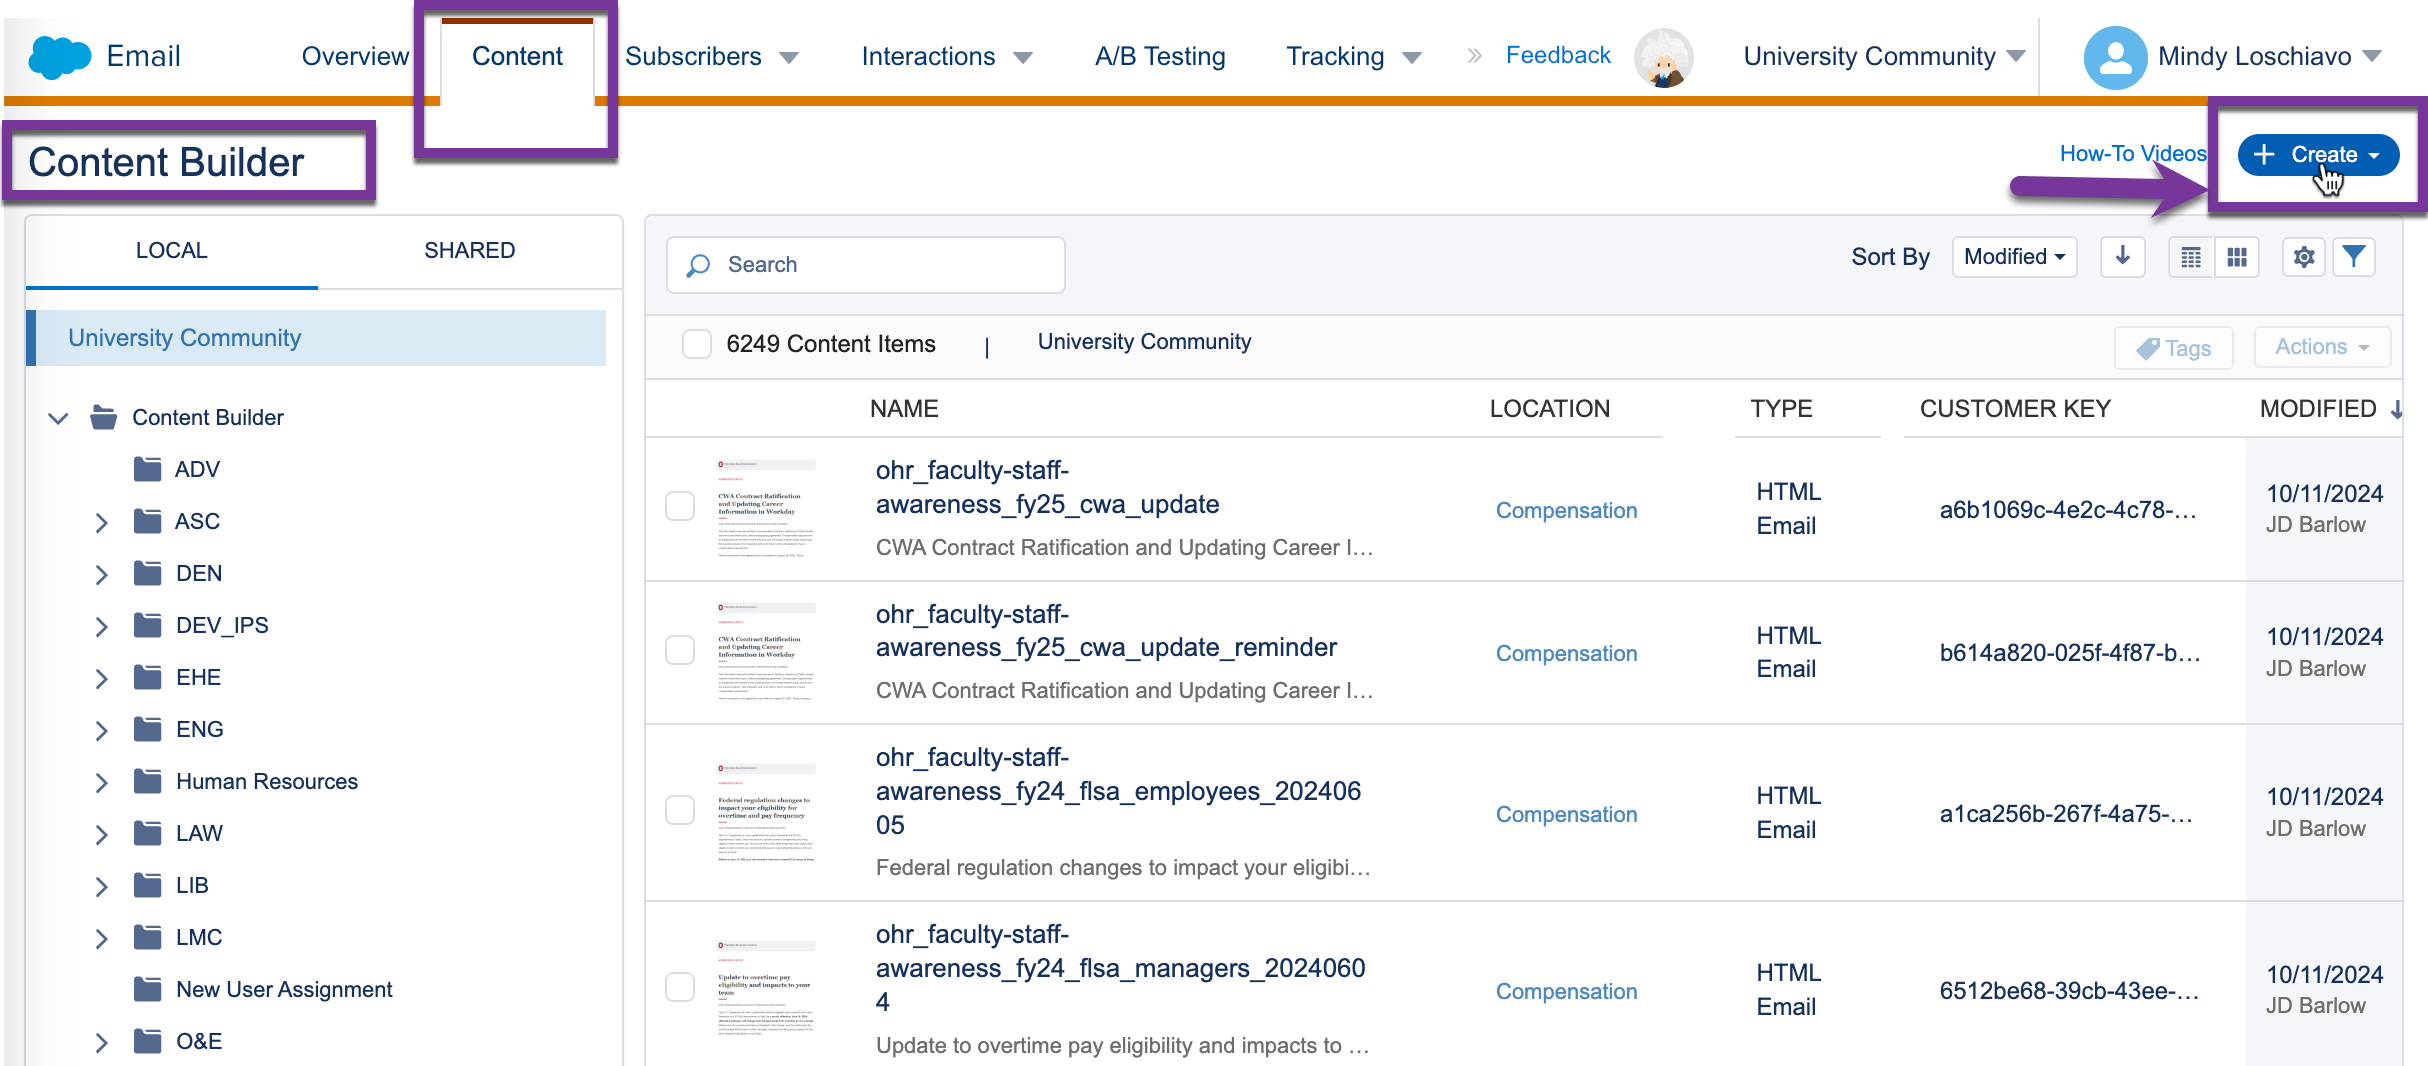
  2. Click Content, and you are in the Content Builder within Email Studio.
SFMC dashboard with Business Unit name and Email Builder highlights with purple boxes
The SFMC dashboard home page. i. Business Unit* you are in by looking at the name between the Einstein icon and your name and person icon. This business unit also identifies the audience type (Alumni Donors and Friends (ADF), University Community (UC), Recruiting, etc.) ii. Click Email Studio, then Email. You are now in the Overview of Email Studio.

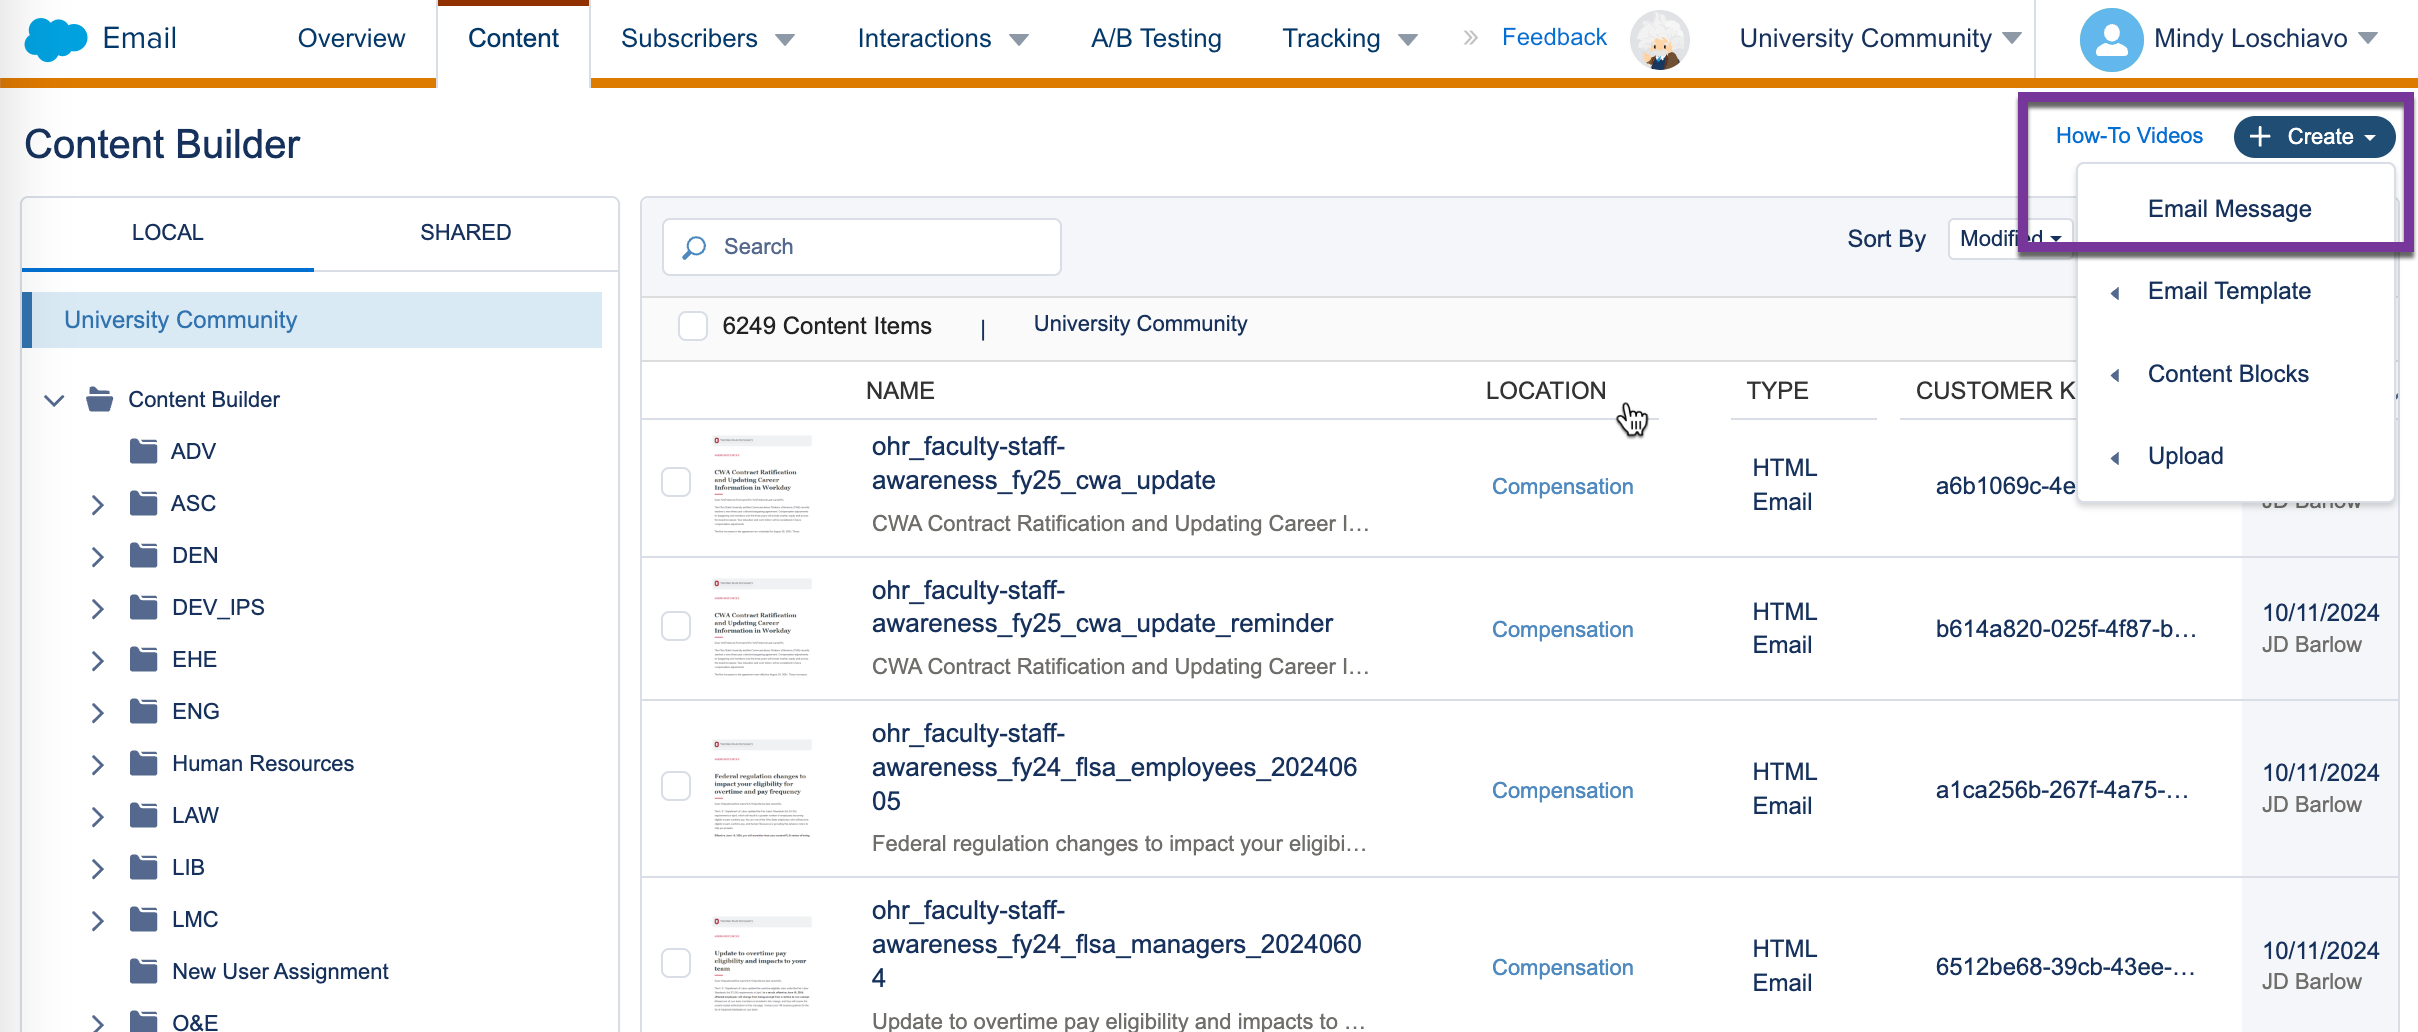
1 4. You will be creating an email by making a copy of an existing email. Click the blue "Create" button in the upper right.

  1. Go to Email Message.
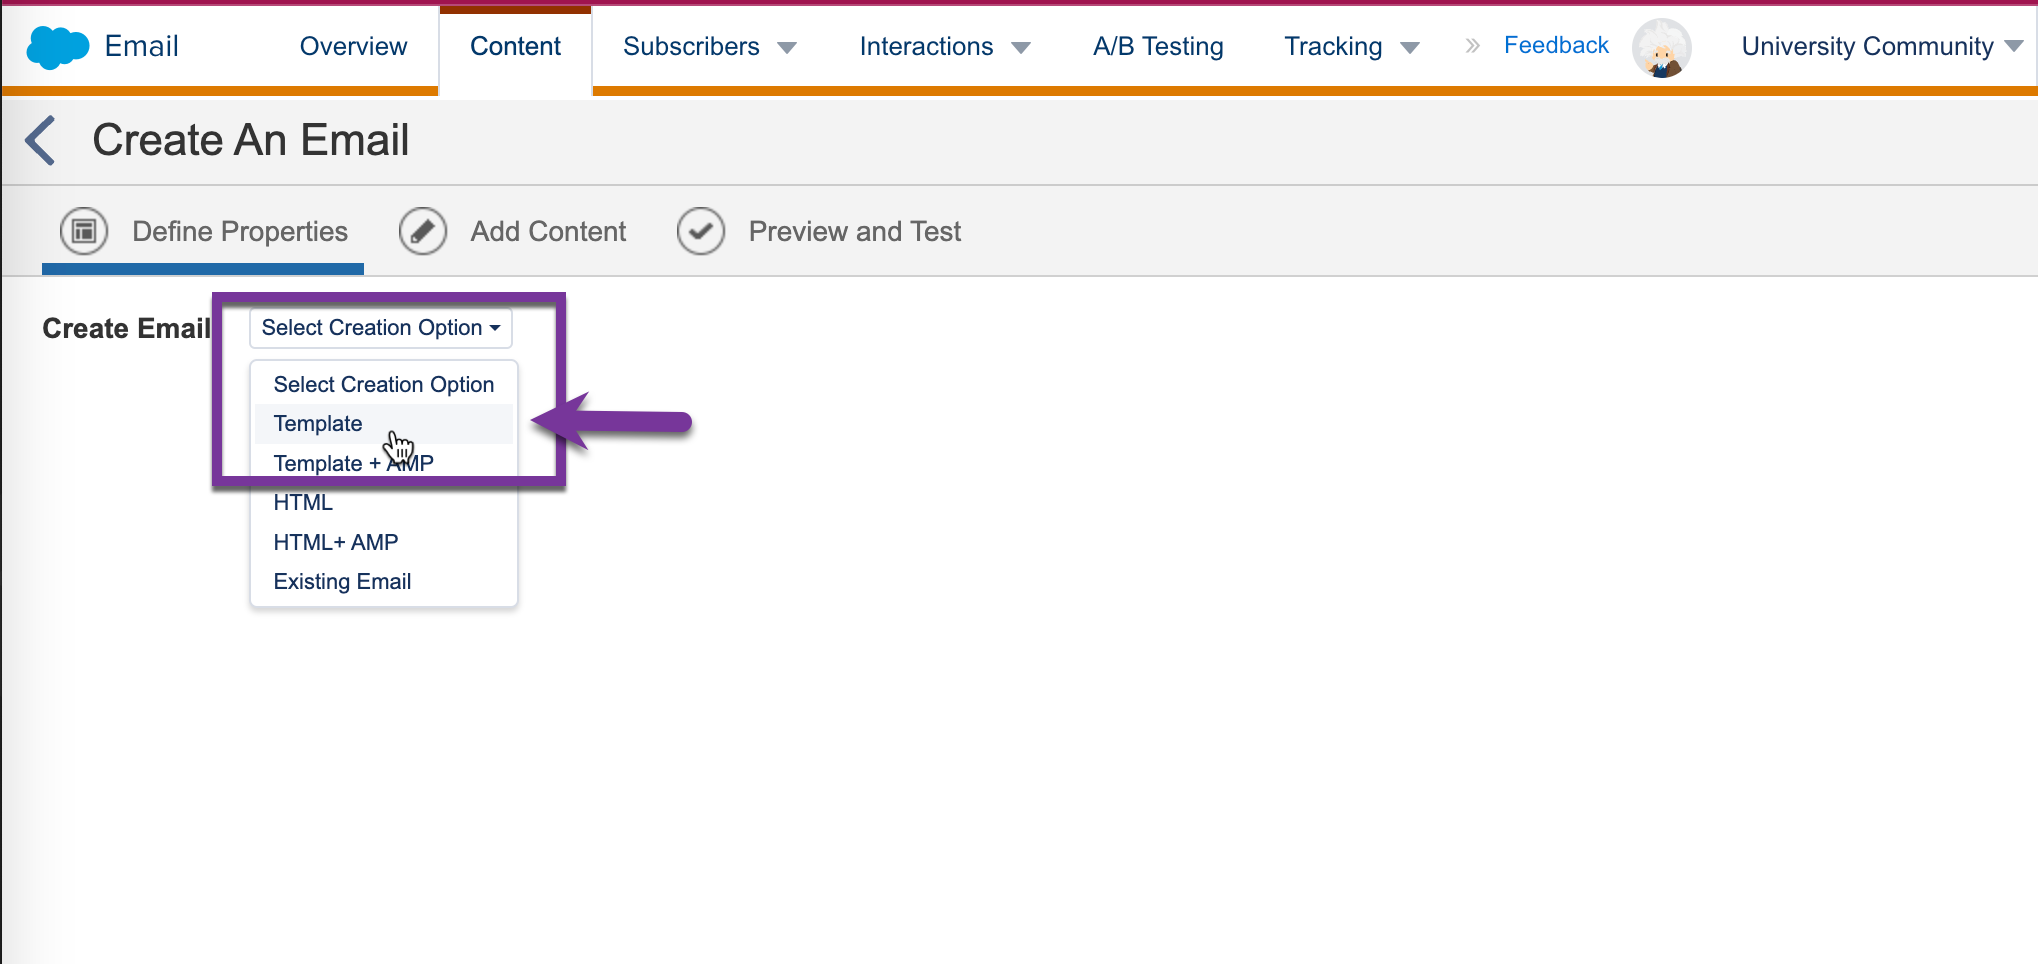
  2. With the “Create Email” dropdown, change the Select Creation Option box to Template. This will make another window appear with templates displayed. Find our Shared ones.
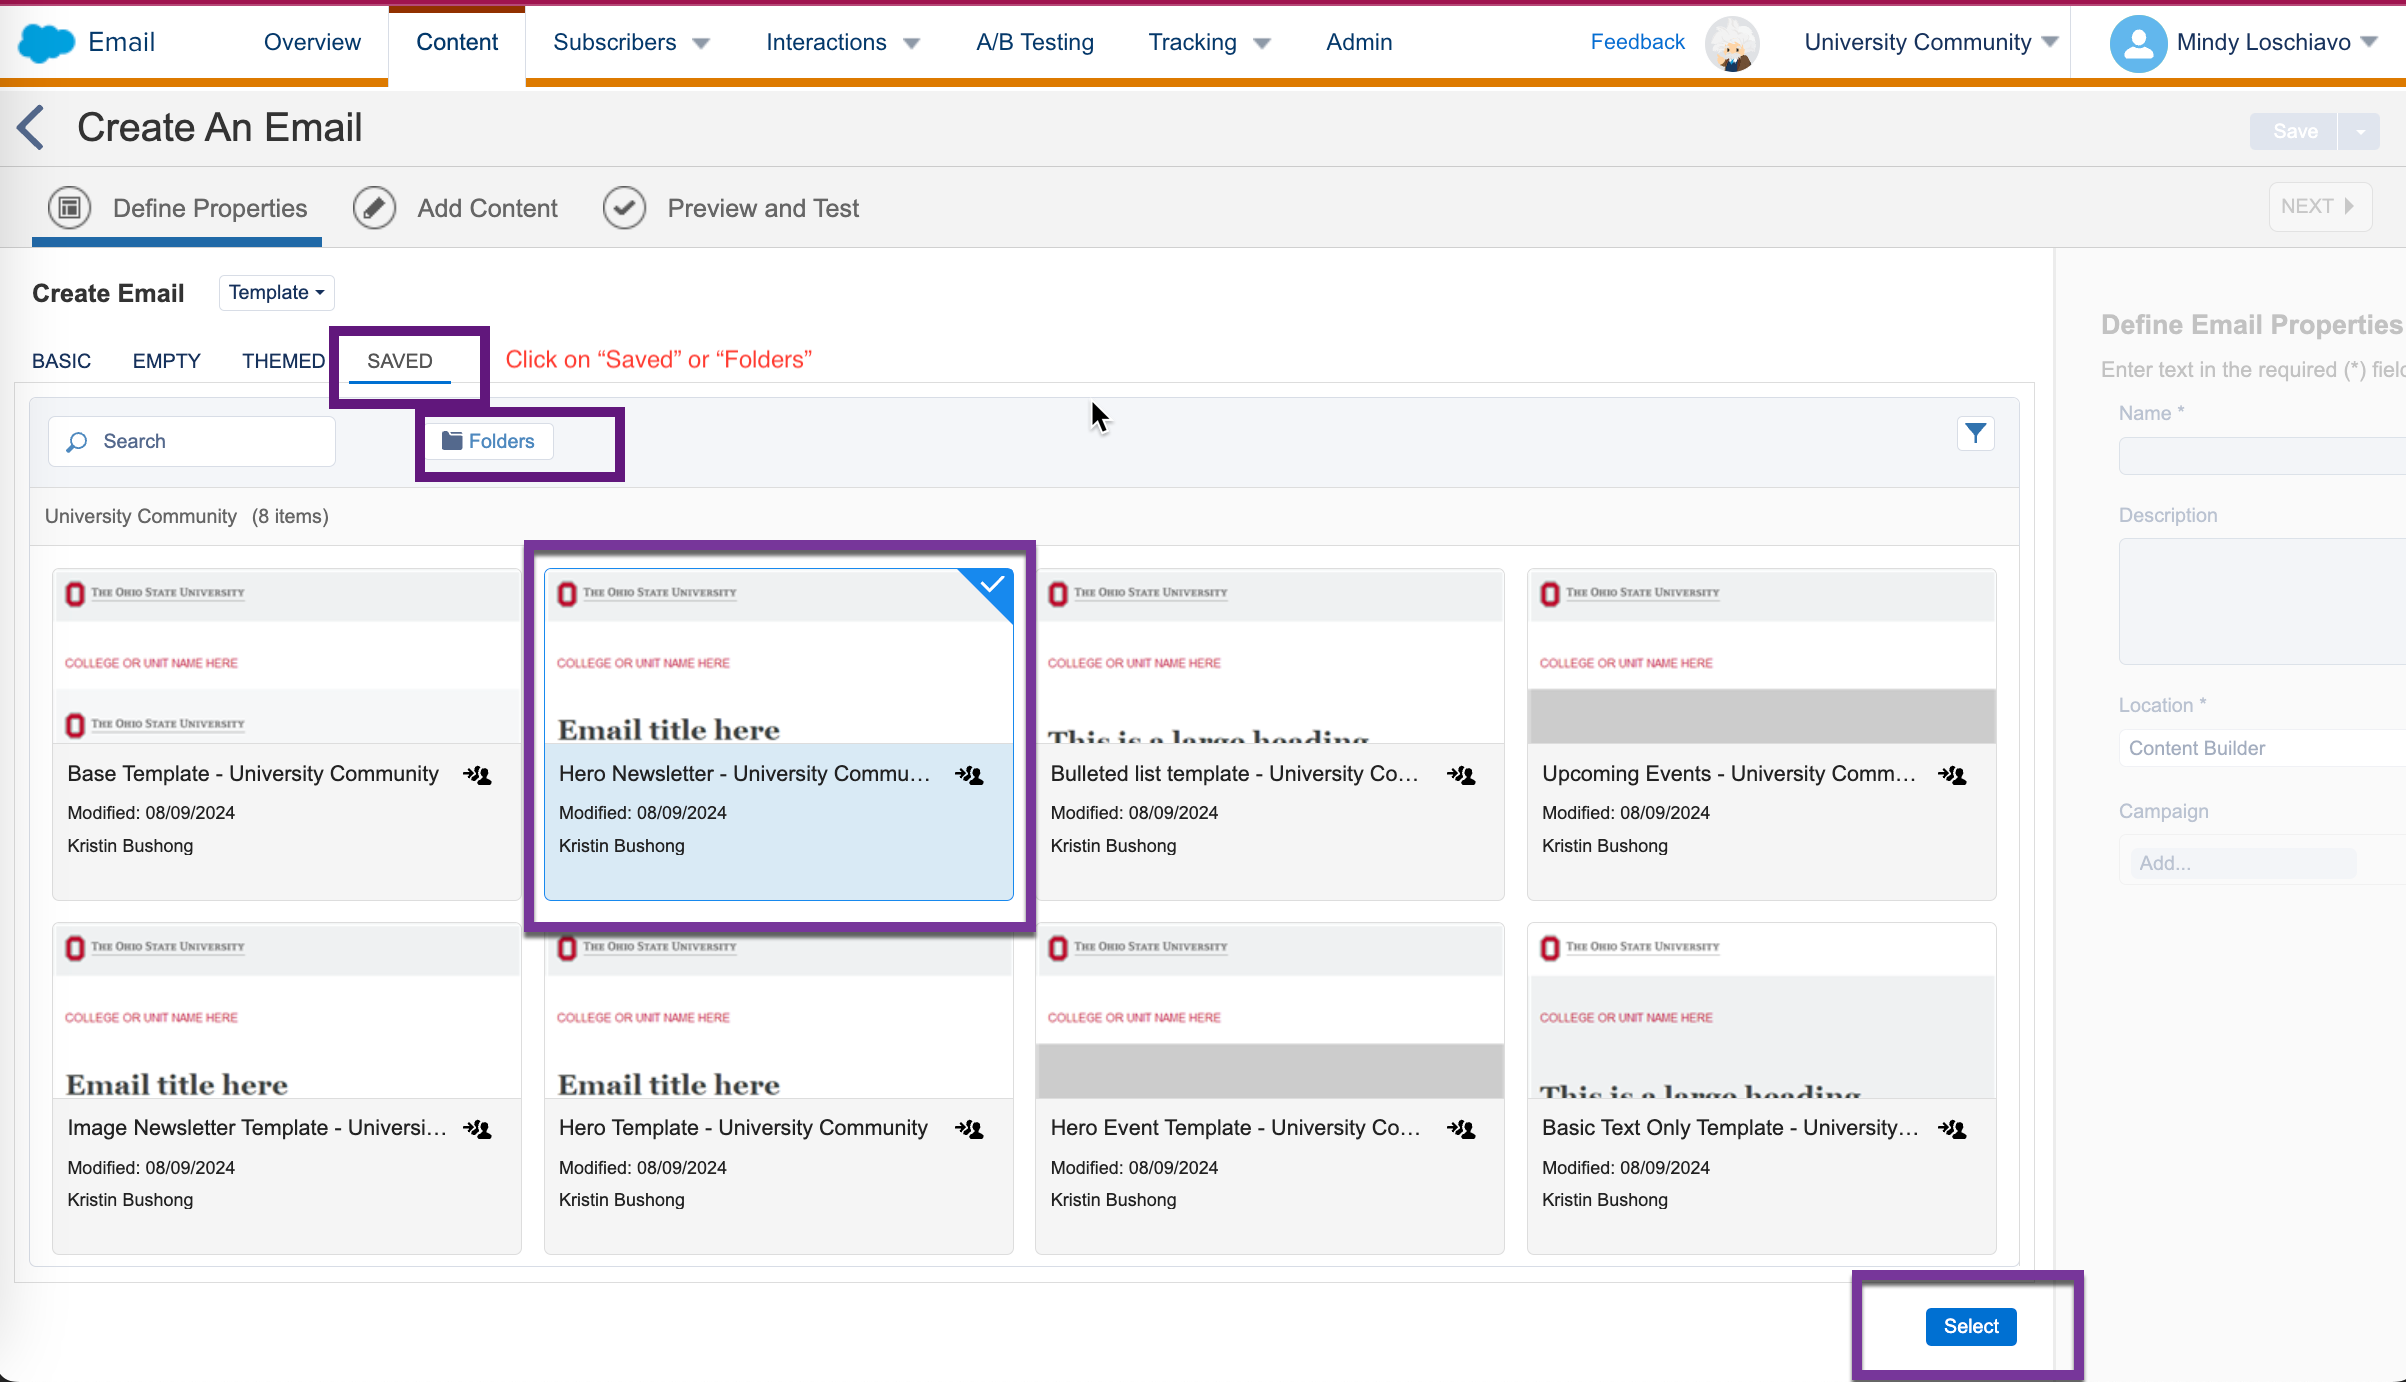
  3. Click the blue folder to go to Shared Folders to start from the university templates or Saved to see full templates.
  4. If you click on the Blue “Folders” icon > Go to Branded Template Assets > the Email Templates for the business unit you are in “Alumni Donors" and Friends” or “University Community” Email Templates
  5. Click the Hero Newsletter and then the blue Select button at the far, bottom right.

2 5. To enter Email Content Studio:

  1. Click Email Studio, then Email. You are now in the Overview of Email Studio.
  2. Click Content, and you are in the Content Builder within Email Studio.

1 6. Create an email by making a copy of an existing email

Click the blue "Create" button in the upper right.

  1. Go to Email Message.
  2. With the “Create Email” dropdown, change the Select Creation Option box to Template. This will make another window appear with templates displayed. Find our Shared ones.
  3. Click Shared to enter the Shared folders
  4. Go to Branded Template Assets > "Business Unit Name" Email Templates (For example, Alumni Donors and Friends Email Templates, University Community Email Templates)
  5. Click the Hero Newsletter and then the blue Select button at the far, bottom right.
The Content Builder area of SFMC within Email Builder
This is the Content Builder area of SFMC within Email Builder. i. Click on Content tab to enter Content Builder
"Create" email drop down to begin building the email
Select "Create" and then
Create An Email interface with a "Select Creation Option" drop down. Select "Template"
Go to Branded Template Assets > the Email Templates for the business unit you are in
ii. If you click on the Blue “Folders” icon > Go to Branded Template Assets > the Email Templates for the business unit you are in “Alumni Donors" and Friends” or “University Community” Email Templates ii. Click the Hero Newsletter and then the blue Select button at the far, bottom right.

1 7. Name your email

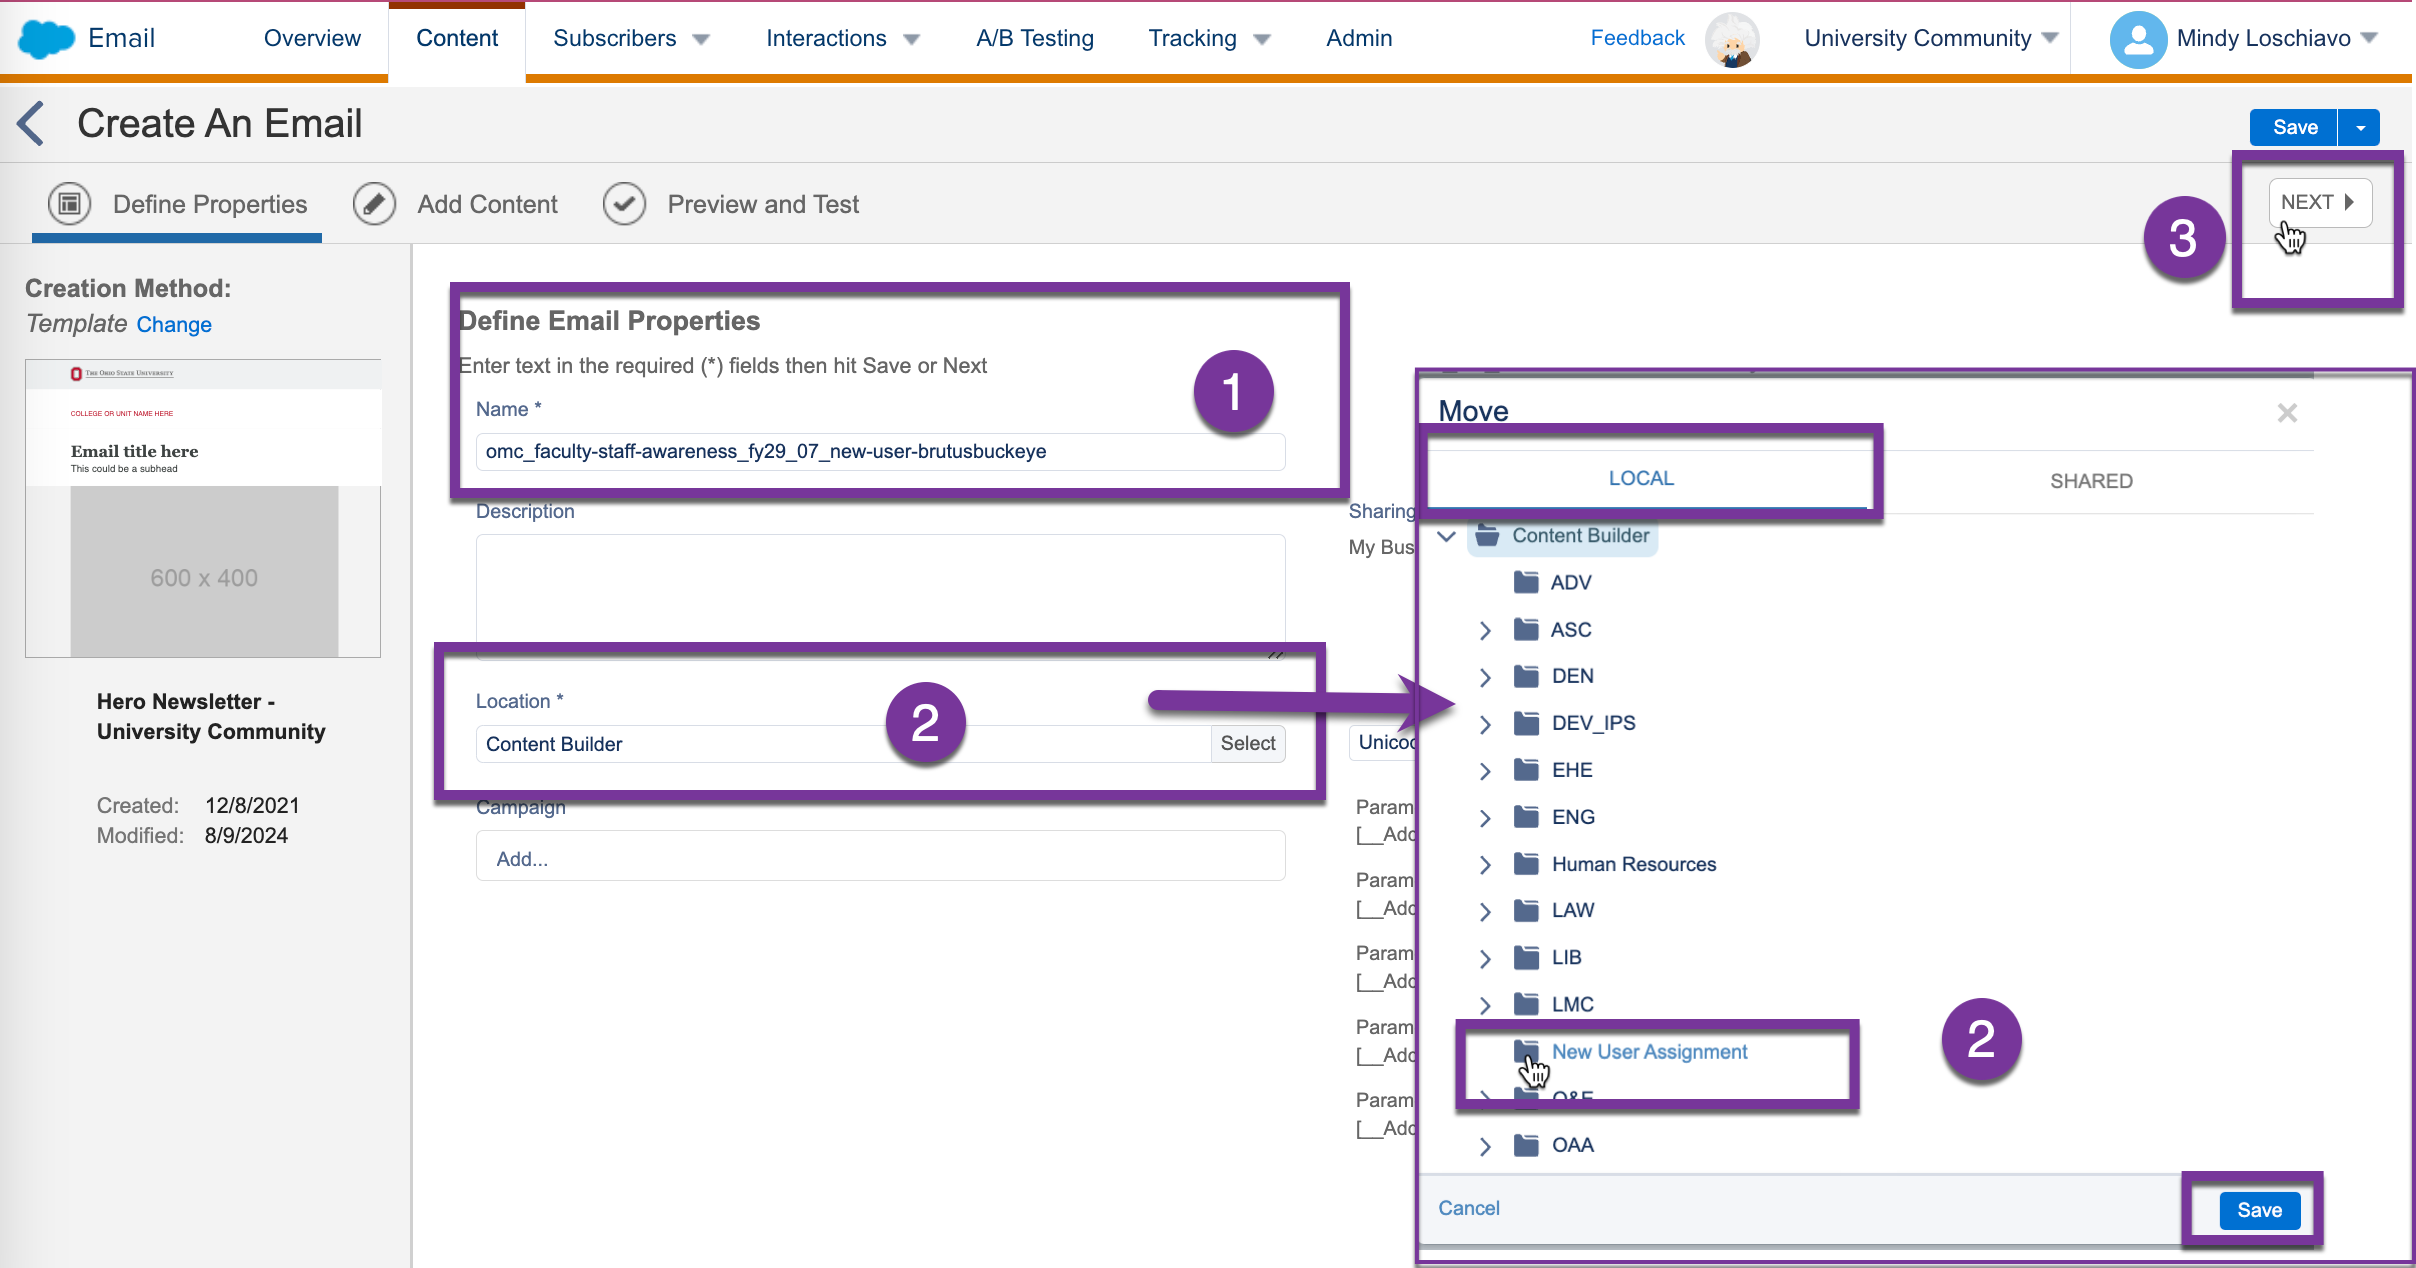
On the next screen, name your email following our naming conventions

omc_faculty-staff-awareness_fy29_numericalmonth_new-user-yourname*
ex. omc_faculty-staff-awareness_fy29_07_new-user-brutusbuckeye

  1. Click Select next to Content Builder to decide where this email will go:
    1. Local folders > Content Builder > New User Assignment > Save here!
    2. Note that this is a copy of that overall Hero Newsletter template that you are sharing in your business unit’s local folders, while the original Hero Newsletter template remains unaffected in the shared folders.
Name the email with the naming convention standards and save the email to the correct college or unit folder
On the next screen, name your email, follow the lines of our naming conventions: omc_faculty-staff-awareness_fy29_numericalmonth_new-user-yourname* i. unitcode_marketing-activity_fyXX_additional-qualifiers(note: all lowercase characters) b. Click Select "Next" in Content Builder to decide where this email will go (bottom right): i. Local folders > Content Builder > New User Assignment > Save here!

1 8. Add subject and preheader

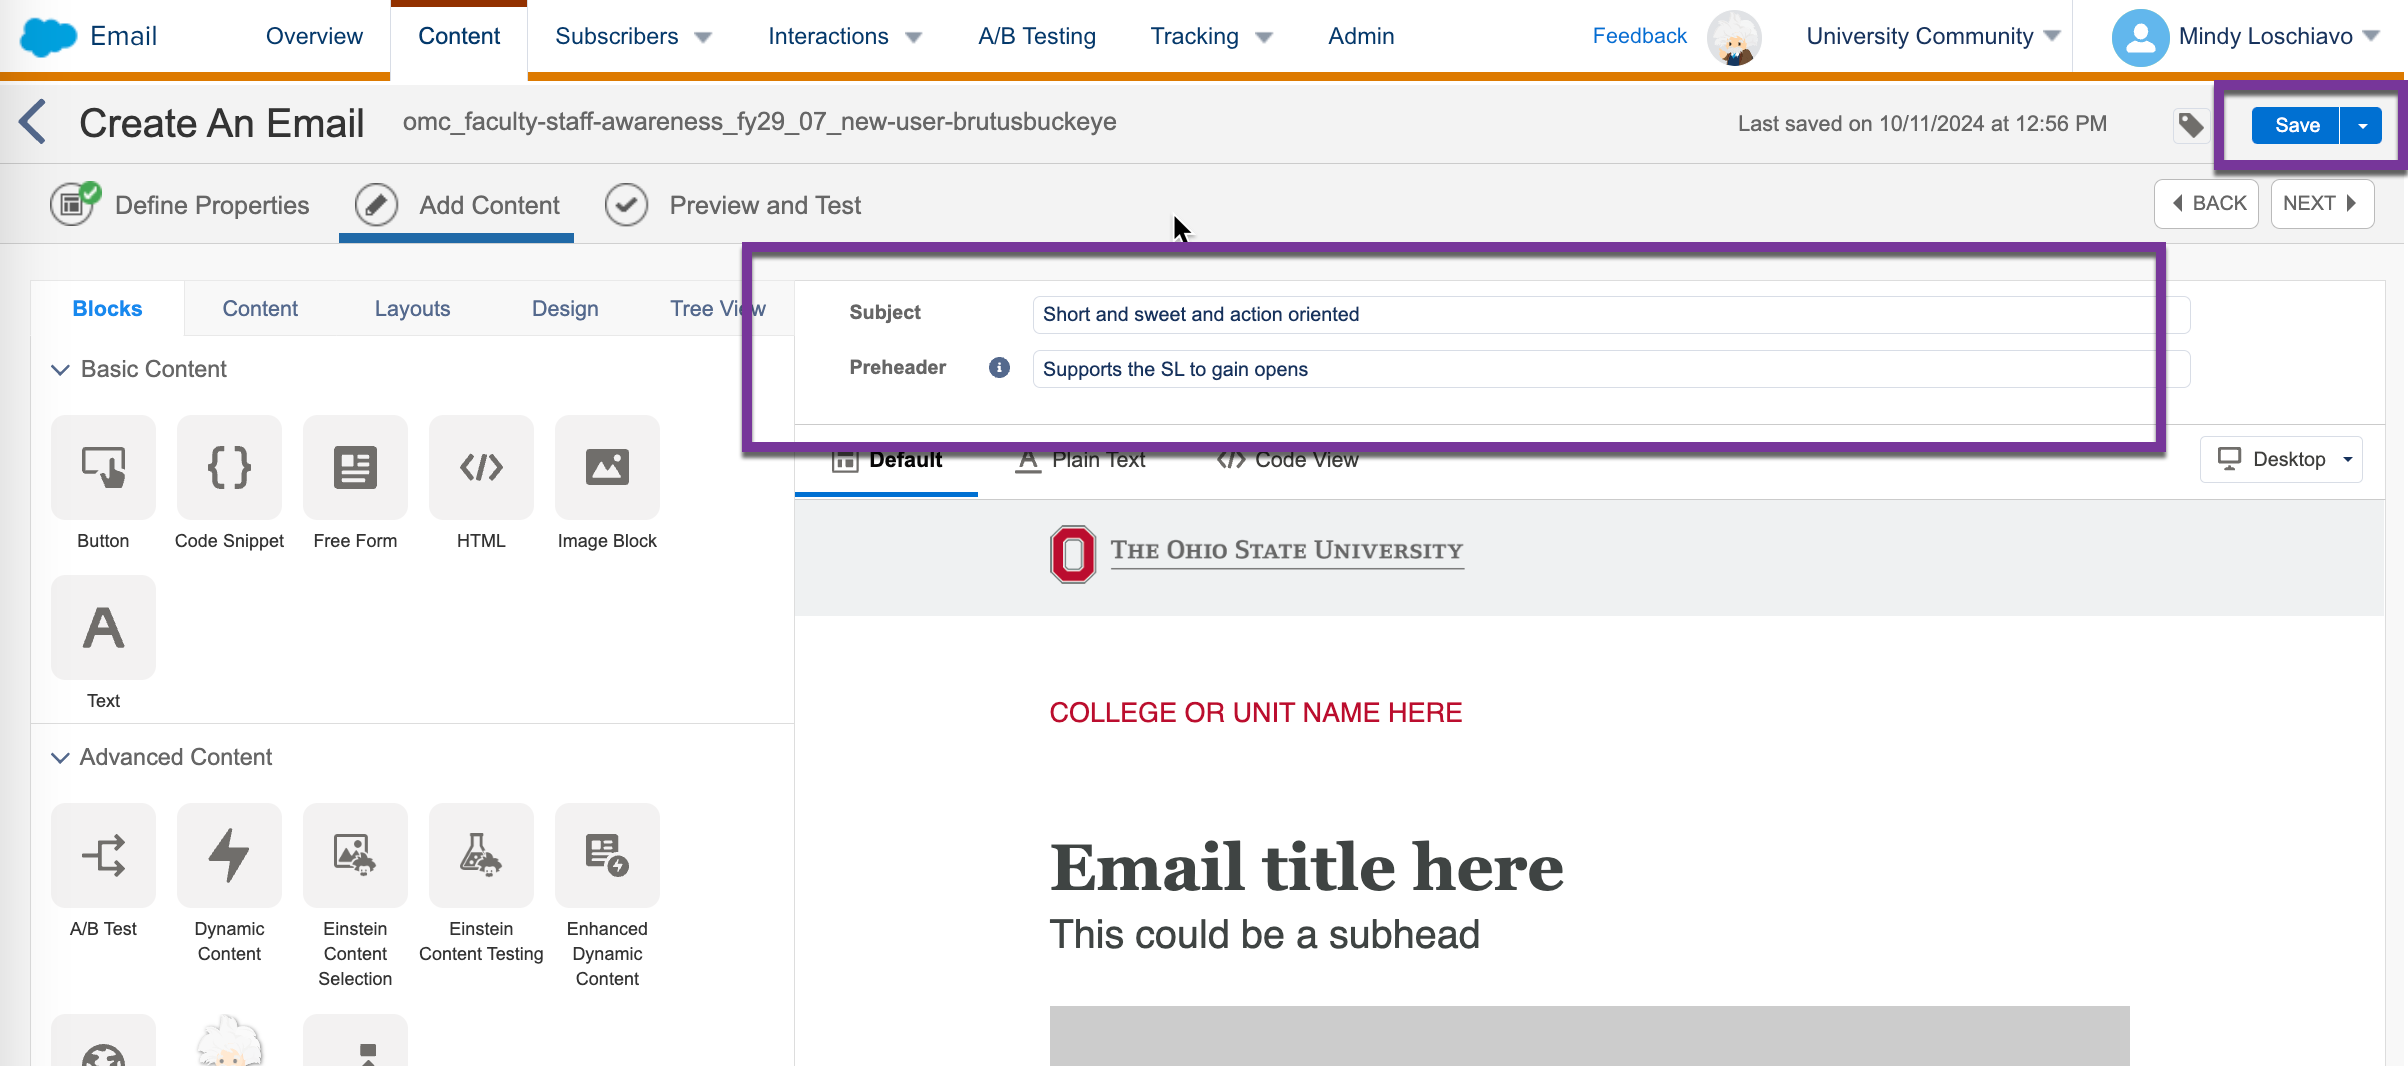
On the email, add your own Subject and Preheader and save. 

Add Subject Line and Preheader
Add your own Subject and Preheader and save to start editing the content of the email.

1 9. Begin editing email content

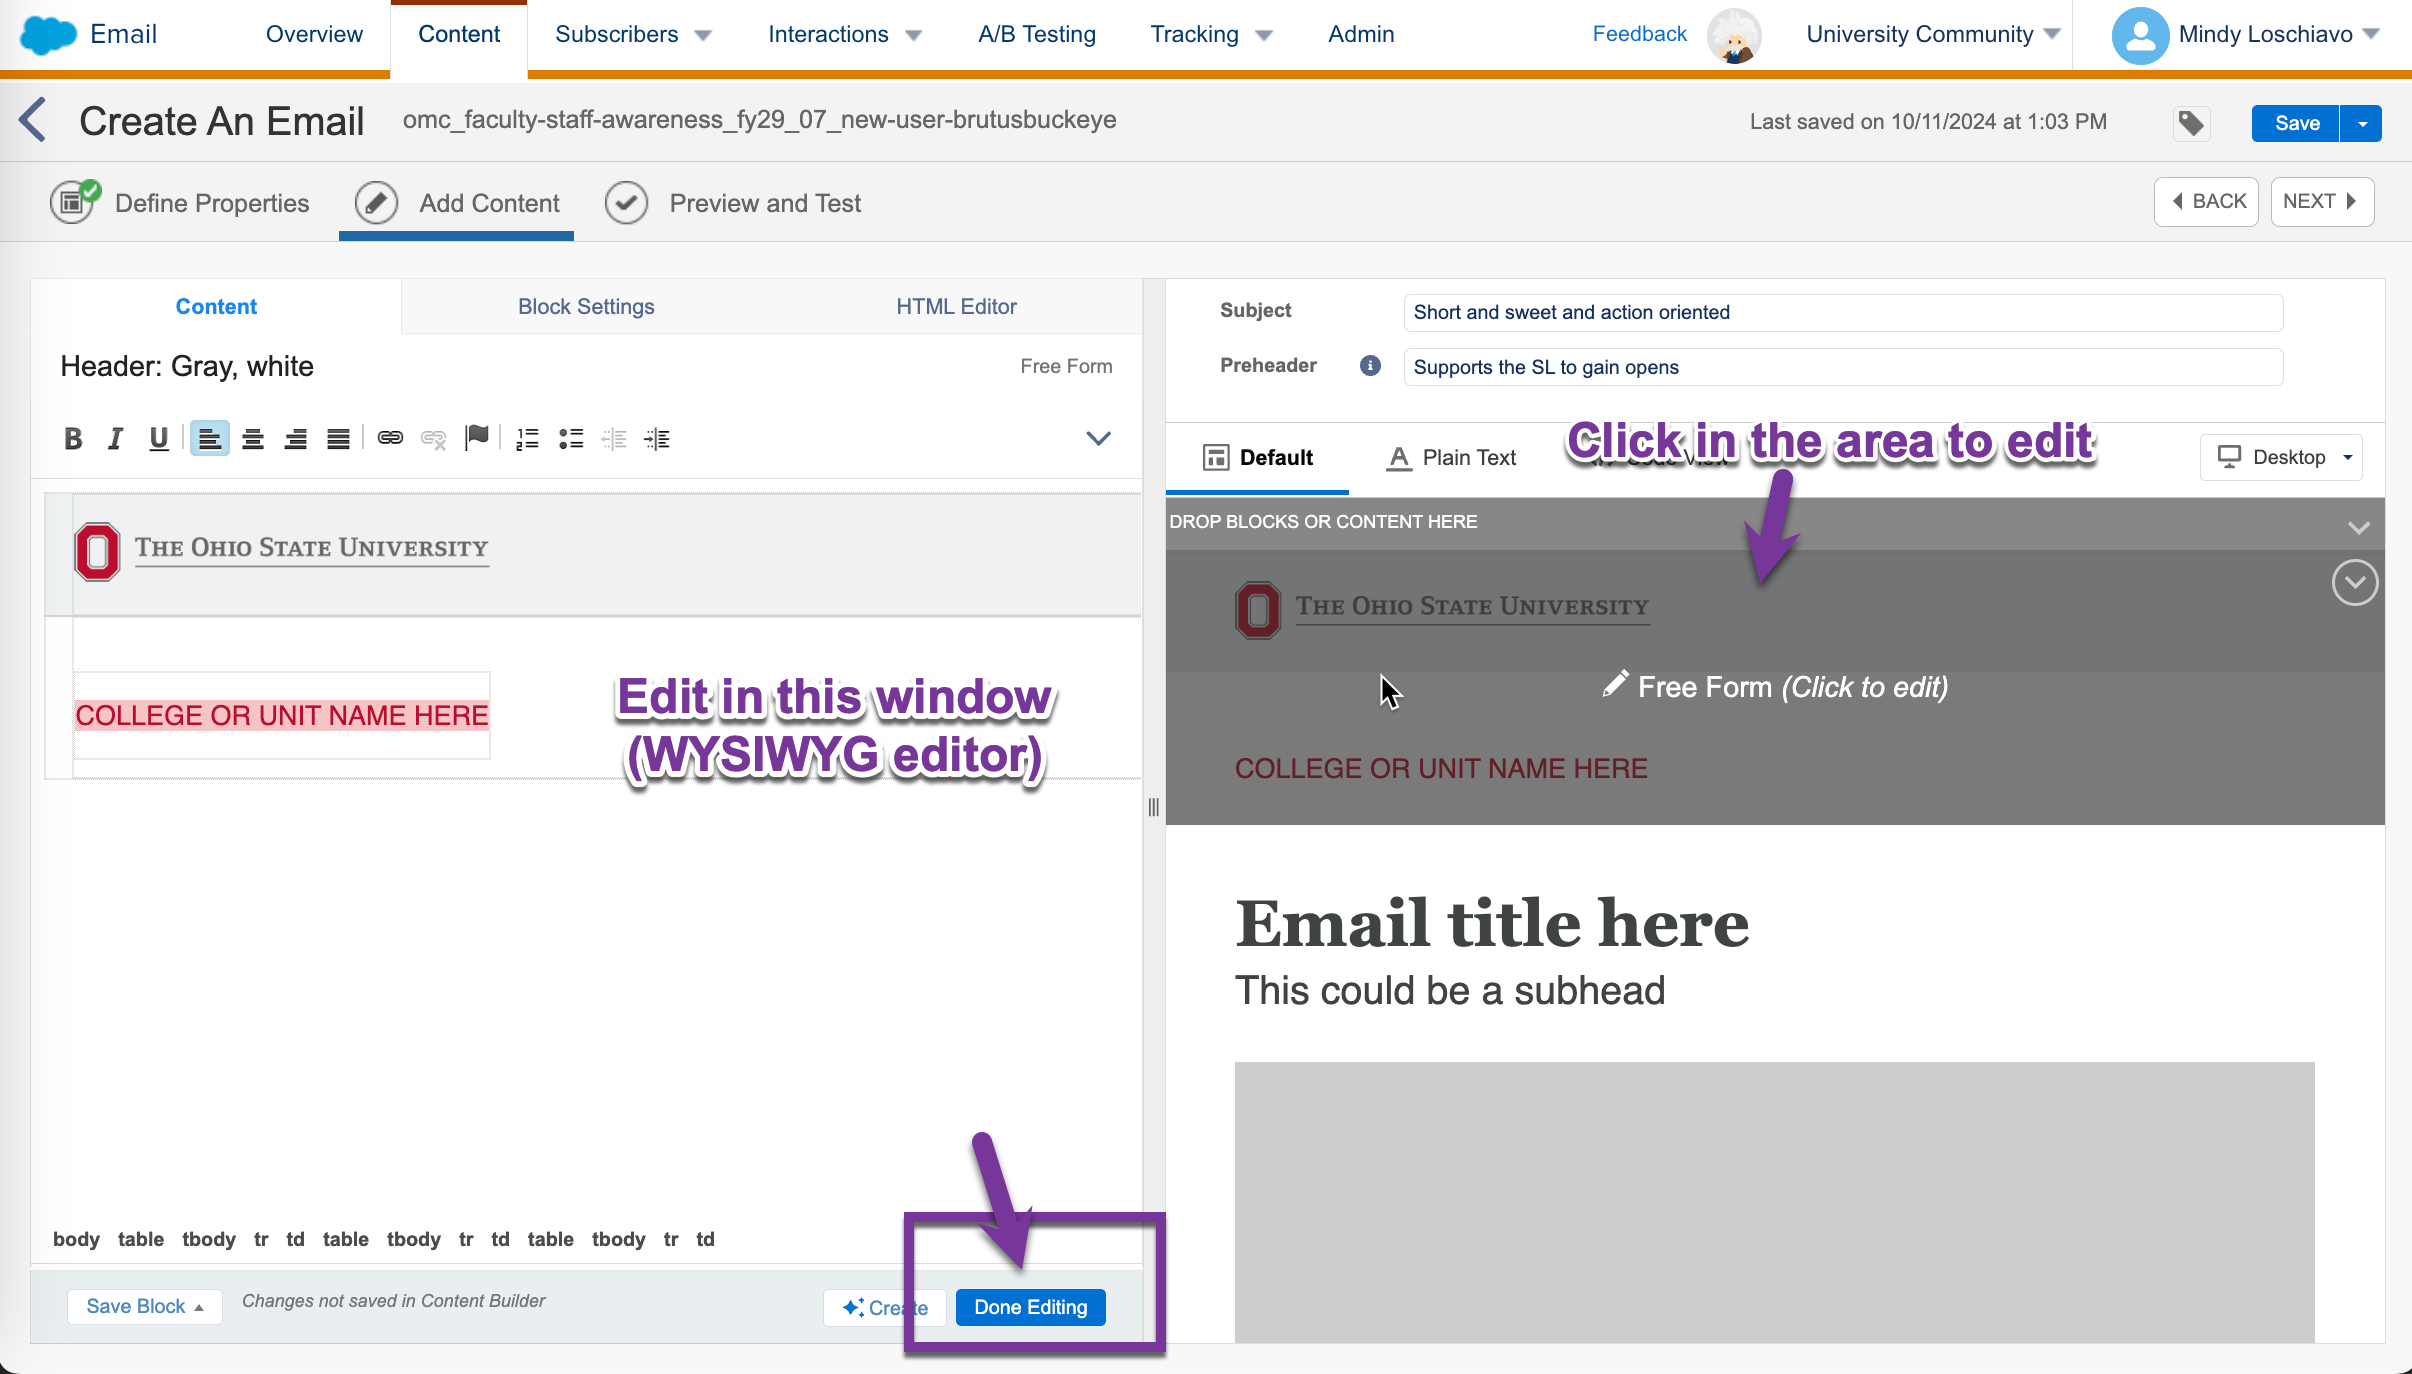
The following steps are on editing the email’s content. When you edit, whether an email or a template, clicking the content on the right allows you to edit in on the left Review details in the Editing an Email video. 

Note: Decrease the zoom level percentage on your browser so you can move content blocks with ease.

2 10. Update header

Click the COLLEGE OR UNIT NAME HERE text to open it on the left. Double click the text and update field to a name of your choice. Note that the brand approved look for this is all caps.

3 11. Update email title and subhead

  1. Copy and paste in the text – but be sure to keep the look and feel of the title and subhead fonts in place.
  2. Review our video on how you can copy in and out of a text editor to have unformatted text! You can also paste with “CTRL+SHIFT+V” on PC, to paste copied text without formatting.
  3. CONTENT >
    1. New email title: New User Onboarding
    2. New email subhead: We’re learning how to make great emails
Screenshot of SFMC Content Builder WYSIWYG for editing content
Editing the email’s content. When you edit, clicking the content on the right allows you to edit in on the left Review details in the There is a video to support learning this editing process. See the link provided in step 8.

1 12. Update the large hero image

Double-click the Hero Image[i] in the editor to open the Image Properties screen. Click Replace.

  1. On the Upload or Select Existing Content popup, navigate to SHARED > Content to Share > New User Assignment > Assets
  2. Select one of these with 600 in the filename. Remember – always size images to the width specified in the sample image. Click OK here to set the image, but we aren’t done yet.
  3. Again, double-click the photo in the editor.
  4. Update the Alt Text. Describe this image for screen readers. 
  5. Scroll down and edit the link from https://www.osu.edu to another link at Ohio State
  6. Enter the link title. This is the accessibility description also known as the ARIA label
  7. Click to save and you have updated the image and its link!

[i] See how the default “hero image” says 600 x 400? Please have your images at the recommended size so they render properly. We have free access to Adobe Express and Canva if you need image editing resources!

2 13. Create medium heading

Now you are looking at the “Head medium + copy + button” module that starts with This is a medium heading. Click this to be able to edit it. 

  1. Paste unformatted text for the Heading
    1. CONTENT > Medium heading: SFMC Resources
    2. Medium heading content: Visit our website to see our training videos, ask for a sender profile, or request an advancement list.
  2. Also paste unformatted text for the Lorem ipsum text
  3. Double-click the CTA link here button to begin editing that
    1. Change the link URL
      1. CONTENT > Medium heading CTA Link: https://omc.osu.edu/tools/sfmc
  4. Enter the link title. This is the accessibility description also known as the ARIA label
  5. Also update the link text. Scroll to the end of that field and replace the CTA link here text with a new CTA (call-to-action)!
    1. CONTENT > Medium heading CTA Text: Visit our website

3 14. Create small heading

Go through step 11 again to update the first “Head small + copy + button” button with a heading, copy, and CTA of your choice. 

  1. Consider going into your own inbox to find content for this. Make sure the text you paste is unformatted!
  2. Also be sure to update the URL and keep it white!
  3. Update the link title/aria label as well

4 15. Applying scarlet to a hyperlink

You need to make any in-text link on in the email scarlet. See this step at 1:20 in Editing an Email.

  1. Click in to edit the block where you will make a scarlet link
  2. Highlight the text that you want to turn into a link, and press the Link icon.
  3. Update the Link URL to your destination (see step 11)
  4. On the Link Color box, where it says “none” enter #ba0c2f (Ohio State scarlet hex color)
  5. Click the box to YES, include underline on hyperlink
  6. Click OK to set link as scarlet.

5 16. Add a content block

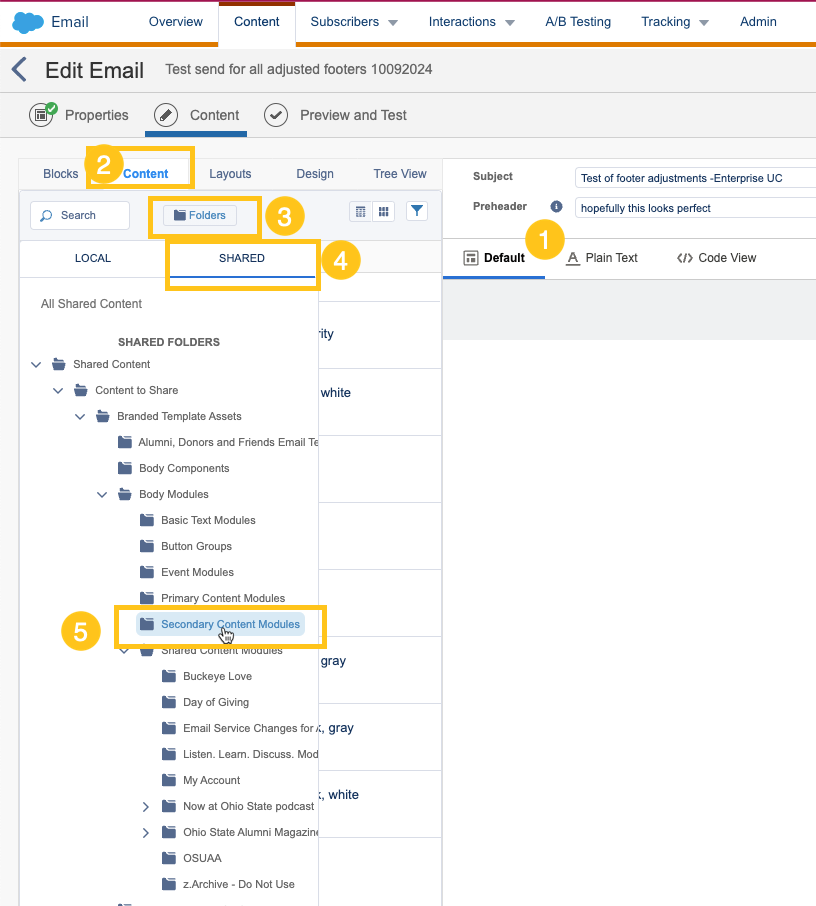
Now let’s add one more block to this newsletter. This is located in the same Shared location. Go to Content, Folders, then Shared, then navigate to the Secondary Content Modules folder.

  1. Click the “Adjacent img right + text, white block, white background” module and drag it to the right in your newsletter between the red bar and footer (where the small heading block was)
    1. CONTENT > Adjacent img right + text, white block, white background” heading: Brand Guidelines
  2. Follow the steps from #10 for updating the hero image to update this 475x475 image, selecting one of the “475” images from SHARED > Content to Share > New User Assignment > Assets
    1. CONTENT > Adjacent img right + text, white block, white background” small heading text: Consistency is key when presenting our visual brand identity to the world. 
  3. Update the Small Heading, Lorem Ipsum text and CTA Link Here (see step 11) to content of your choice.
  4. CONTENT > 
    1. CTA Link Text: Your choice, linking to Our Brand page
    2. CTA Link: https://brand.osu.edu/brand-guidelines/our-brand

1 17. Delete a content block

Easy step of deleting a content block on this email: 

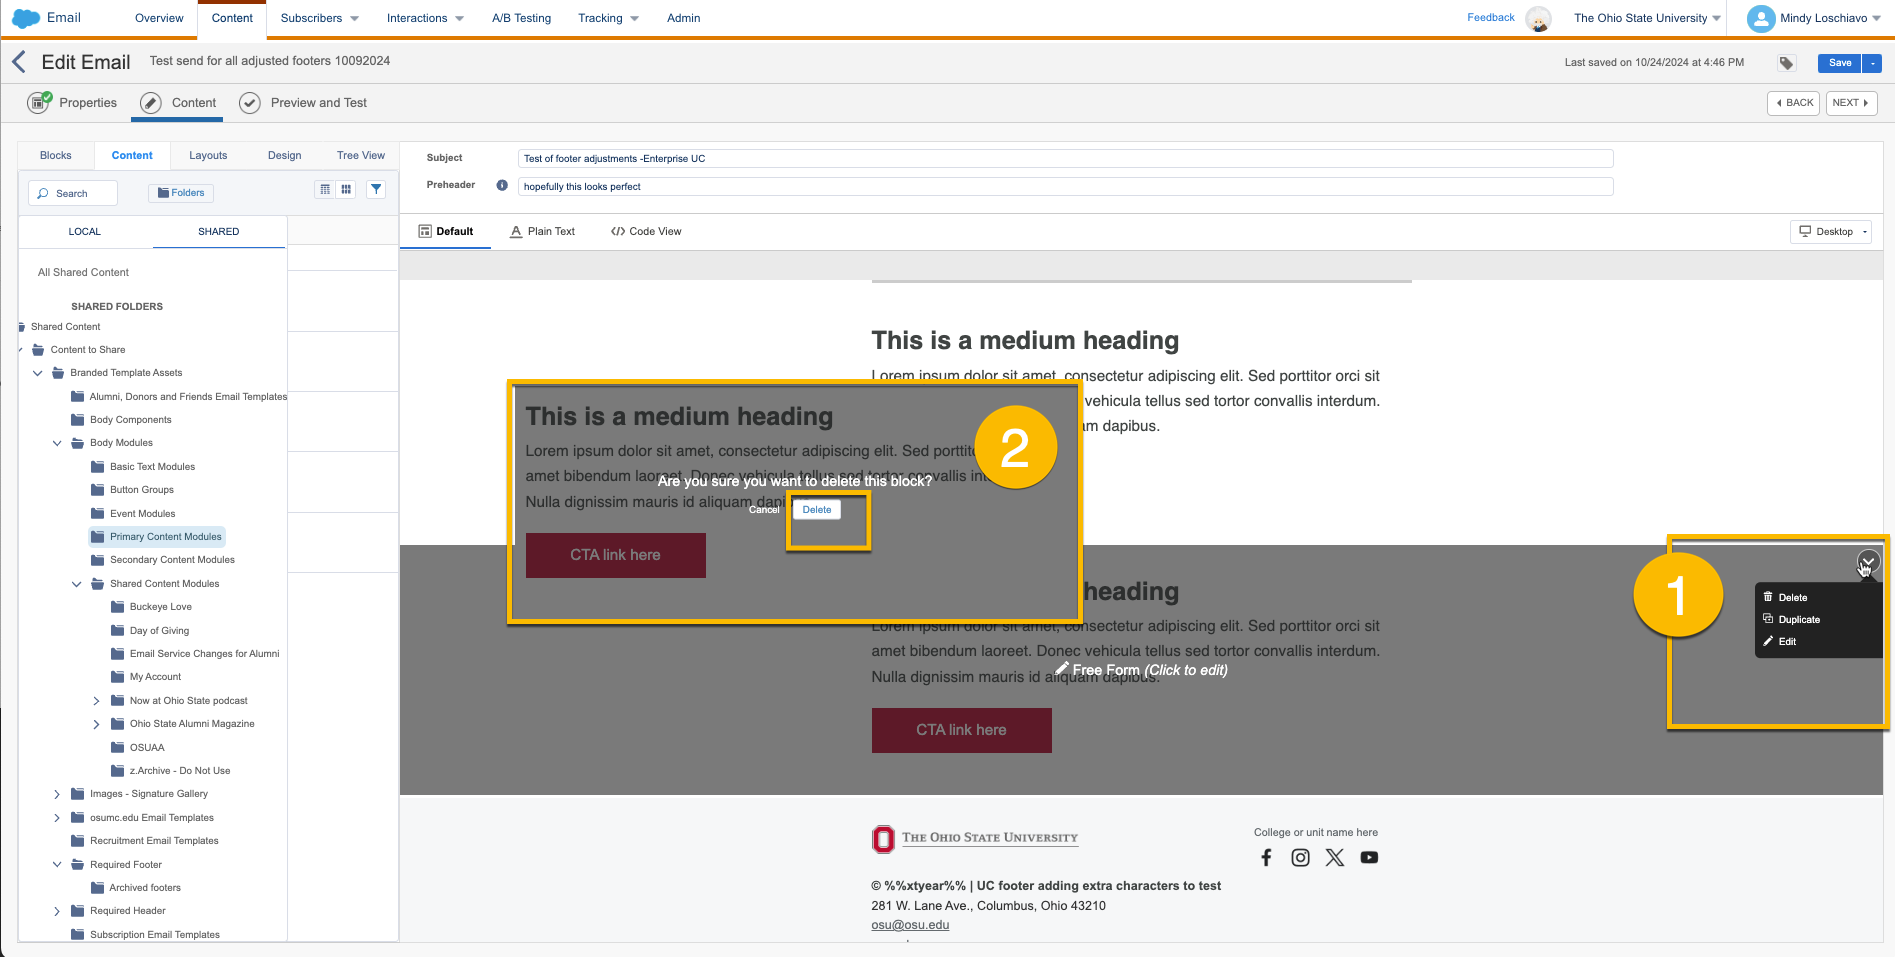
  1. Delete the second “Head small + copy + button” by going to the carrot on the right and scrolling to Delete.
Screenshot of SFMC Content Builder, showing the dropdown on the right to delete a content block
Delete a content block by going to the carrot on the right and scrolling to Delete. Then a second area will appear asking to confirm the deletion.

1 18. Update the footer[ii]

First, make a copy so you can easily revert to an original version (consider this anytime you work in SFMC!)

  1. As you have been, click to edit the parts to reflect your unit’s specifications.
  2. Click what you what to edit to make changes.
  3. Delete any social media icons you do not need.
  4. DO NOT remove "© %%xtyear%%" or the “unsubscribe” or “Manage preference” links. These details are part of legal requirements for email. 
  5. %% signs are an indicator of scripting that will auto populate on send. 

[ii] You may need to update your footer as requirements change. The footer is an important part of email content for legal and delivery purposes.

When you are done, submit the assignment by populating this form. We will review your submission within two business days. Please leave a comment if this was a helpful task, if an update is needed, or if you have any other comments or questions. 
 Thank you for your time and attention in learning to use Salesforce Marketing Cloud.